In the bottled water production line, the bottle blowing process forms the foundation of the entire production workflow, determining the shape, strength, and quality of the bottles. Preforms are heated, stretched, and blow-molded into the final bottle shape within the blow molding machine. To ensure production efficiency and product quality, it is essential to precisely control the heating temperature, preform positioning, and the stable operation of the equipment during the blowing process.
一、The Principle of Blow Molding
The blow molding process of a blow molding machine is divided into two main parts:
1. Preheating
The preform is heated by infrared high-temperature lamps, which soften the body of the preform. To maintain the shape of the bottle neck, the neck area is not heated. Therefore, cooling devices are used to keep the bottle neck at a stable temperature.
2. Blow Molding and Forming
In this stage, the preheated preform is placed into a blow mold. High-pressure air is then injected into the preform, stretching and blowing it into the desired bottle shape.
Fully automatic blow molding machines combine these two steps through robotic manipulation, eliminating the need for manual transfer of the heated preform into the blow mold. This significantly increases the production speed.
二、The Process Flow of a Blow Molding Machine.
The blow molding process of a blow molding machine is a biaxial stretching process, during which the PET chains undergo biaxial extension, orientation, and alignment.
This increases the mechanical properties of the bottle wall, improving its tensile strength, impact resistance, and airtightness. Although stretching helps enhance strength, excessive stretching should be avoided. The stretching blow-up ratio should be controlled properly: the radial ratio should not exceed 3.5–4.2, and the axial ratio should not exceed 2.8–3.1. The wall thickness of the bottle preform should not exceed 4.5mm.
Blow molding takes place between the glass transition temperature and the crystallization temperature, typically controlled between 90–120°C. Within this range, PET exhibits high elasticity. After rapid blow molding and cooling, the bottle becomes transparent. In the one-step method, this temperature is determined by the cooling time during the injection molding process (e.g., using a Qingmu blow molding machine), so it’s important to coordinate the injection and blow stations properly.
The blow molding process consists of stretching, first blow, and second blow. Although the duration of these three actions is very short, they must be coordinated well, as the first two steps determine the overall distribution of the material, which affects the blow molding quality. Therefore, adjustments should be made to the starting point of stretching, stretching speed, timing of the pre-blow start and end, pre-blow air pressure, and pre-blow airflow. If possible, it is also important to control the overall temperature distribution of the preform and the temperature gradient between the inner and outer walls of the preform.
During the rapid blow molding and cooling process, induced stress is generated in the bottle walls. For carbonated beverage bottles, this stress helps resist internal pressure, which is beneficial. However, for hot-fill bottles, it is important to ensure that the bottle fully releases stress above the glass transition temperature.
三、How to Maintain a Bottle Blowing Machine
Blow Molding Machine Maintenance and Servicing Includes Four Key Areas: Cleaning, Lubrication, Inspection, and Fastening.
Before any maintenance, be sure to power off the machine — this is critical. The maintenance tasks are as follows: cleaning and inspection must be done during every shift as part of daily maintenance. Lubrication is recommended weekly, and fastening can be done monthly. The specific maintenance measures include:
Before starting the plastic blow molding machine each shift, lubrication oil must be added to all moving parts (such as the manipulator, manipulator guide rail, mold opening and closing guide rail).
Lubricate the swing arm every 3–4 days. Lubricate the heating machine's large and small chains once a month. Frequently check if the main machine reducer and the heater reducer are low on oil. Lubricate the main shaft bearings every 2–3 months.
Before production, inspect whether all moving parts are secured, whether any screws are loose or falling off, especially in areas under strong impact. Also check whether the belt drive system is functioning normally.
Check if the high-pressure air supply, low-pressure air supply, power supply, and water supply are all operating normally.
Inspect all emergency stop switches, safety door switches, and protection device detection switches for proper function.
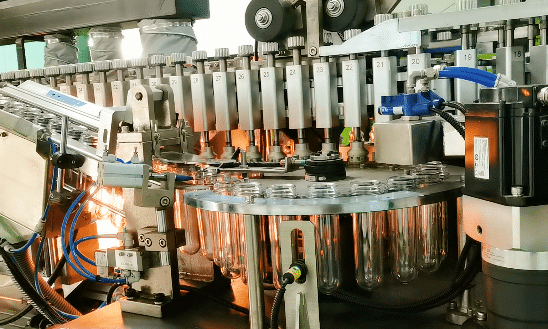
Check whether the preform feeding and dropping mechanisms in the heating area are operating properly. If the preform is not in the correct position, adjust the preform pressing unit.
Check whether any heating lamps are damaged or broken. Replace immediately if necessary.
Check all pneumatic components for air leaks and ensure they move smoothly.
Inspect the air treatment unit (FRL) for air leaks or blockages. Check whether the water cup is too full.
If a solenoid valve malfunctions, clean it immediately.
Blow mold must be regularly cleaned and polished.
When turning on the high and low air pressure valves, do so slowly to prevent dirt from blowing into the solenoid valve due to rapid airflow. Also, open the exhaust valve for 30 seconds to ensure clean air.
Before starting the machine, ensure that all mechanical parts are in good condition, that no one is inside the machine, and that no foreign objects are present — especially around the handwheel to avoid injury. Also, close the safety doors.
When starting the machine, first start the motor, then wait 30 seconds before turning on the heater to avoid voltage fluctuations. Confirm that the cooling water is on before heating.
After 2–3 minutes of heating, when the oven temperature is stable, press the preform feed button. Also, make sure the blowing system power is on; otherwise, the machine will not blow bottles.
While the blow molding machine is running, closely monitor for unusual noises. Address issues early by stopping the machine if necessary.
In case of emergency, press the emergency stop button for immediate shutdown. Then analyze the situation and resolve the issue promptly.
Once running normally, do not insert any body parts into the machine to avoid injury from the manipulator. If unusual noise occurs, slow the machine down before inspection.
During production, operators should frequently check bottle quality to avoid issues caused by voltage fluctuations or other factors.
During maintenance, use the "Fault Maintenance" button on the touchscreen to ensure safe repair. If you need to test individual mold cavities manually, pay attention to the manipulator's position and understand each button's function clearly before operation to avoid accidents.
After every repair, always clean up tools and screws to prevent them from being left inside the machine, which may affect normal operation.